There's already couple of good Sitecore Docker base images repositories on GitHub allowing you to quickly build and run Sitecore in Docker containers. Recently Martin Miles wrote a great tutorial on how to start with Sitecore in Docker containers. I'll explain how to make the next step and perform development of your Sitecore instance running in Docker.
1. Repository with Sitecore Docker base images
To start, we need Sitecore Docker images. sitecoreops/sitecore-images repository offers a diverse set of Sitecore (up-to-date - 9.1.1) base images providing you with scripts to build and run Sitecore in XP0, XM1 and XP1 topologies, including images with pre-installed Sitecore modules. Thanks to that, you can easily deploy a scaled instance of Sitecore with SXA or JSS!
2. Docker registry (Optional)
It's not necessary, but makes your work with images easier as you can store a collection of built, ready to use images for immediate download. In case you don't want to use it, just modify the Powershell script provided in sitecore-images and cut out the code section referring to image upload. Alternatively, to turn off the image upload temporarily while keeping the registry configured and ready just in case, set the PushMode to "Never" (instead of "WhenChanged" by default).
My registry of choice is Azure Container Registry. Used it only as for image storage purpose, however, it offers many more features such as automatic image rebuild on code repository commit allowing you to always have an up-to-date collection of images corresponding to the latest code base. What comes in handy is that you can create as many repositories as you want. That's great in case of trying out XP1 topology consisting of 7 containers running in parallel (SOLR, SQL, CM, CD + another 3 for XConnect). Images are built with explicitly defined layers (separate Dockerfiles), so for instance the SXA CM is constructed with the following dependency chain, where each image means a separate repository:
sitecore-xp-sxa-1.8.1-standalone
sitecore-xp-pse-5.0-standalone
sitecore-xp-standalone
sitecore-xp-base
Basic tier gets you 10GBs of storage what costs less than 4£ a month (~$5; in North Europe Azure region). Complete set of images required to run SXA and JSS in XP takes less than 3GB, so the offered space seems to be definitely enough for a start. What's awesome, you don't have to update to a higher tier if running out of storage - you pay as you go and for example, another 10GBs used costs you around 0.8£ (~$1) a month, where all the extra costs are charged per day. Similar basic setup on Docker Hub would cost me $22 a month, so that was a no-brainer.
3. Volume configuration
Code: To deploy code to Docker container, you need to define a volume with a proper binding. It directly reflects the state of your local folder within a container. That means if you're hoping for binding your local Sitecore deployment folder to the container instance folder to blend your code in - that's a nope. Instead, the Sitecore instance files in container would get overwritten. The resolution is to use volumes to let your Docker container to access files from a host folder. That means you need to split your code deployment into 2 steps:
- Deploy your code to a local deployment folder binded to a folder in Docker container
- Copy that code to the Sitecore instance within your Docker container
To make the binding work as above, add this to your container's volumes section in docker-compose.yml:
volumes:
  - type: bind
    source: C:/Dev/Sitecore91/docker
    target: C:/deployment
"C:/Dev/Sitecore91/docker" is your local deployment folder where you deploy your solution and serialization files ('C:/Dev/Sitecore91' is my solution dev folder, so just added a 'docker' folder to it as a sibling of 'src' folder)
"C:/deployment" is a folder in your Docker container, where locally deployed files are accessible from
Serialization: To make the Unicorn serialization work, your CM instance needs to have serialization files accessible. To achieve that, you also need to use a binded folder as mentioned. Not to create additional bindings, let's use the one above making that folder a root container for both code and serialization files. Important thing to mention is that Unicorn locates the serialization files based on the folder structure as defined in your Unicorn config files. That means if you stick to outlined convention you need to copy the serialization files preserving the folder structure, just as they get serialized in your solution folder.
Tip Despite container recreation, your changes made to Sitecore databases will be preserved. Why's that? SQL instance in sitecore-images repo is pre-configured to use volumes too. If you take a closer look at sitecore-compose.yml, the SQL container definition has a volume defined:
volumes:
  - .\data\sql:C:\Data
which contains differential backups for all the databases used in your Sitecore Docker deployment. Need clean, OOTB databases? Just delete those backups before the next run.
4. Solution configuration
Code: You need to create a publishing profile deploying files to your local deployment folder binded to the container. Make sure it's a separate, empty folder so that you can fully purge it before each deployment to assure it contains only the current unit of deployment (no leftovers). I just made it "C:\Dev\Sitecore91\docker\code".
Serialization: Unicorn depends on the sourceFolder variable defined in your config files. Make sure it contains a valid path within your Docker container, so in our case:
<sc.variable name="sourceFolder" value="C:\inetpub\sc\serialization" />
"C:\inetpub\sc" is a default sc instance folder defined in Dockerfiles for base images in sitecore-images repo.
5. Deployment scripts
Here's a basic script performing code deployment. You can run it each time to deploy the code, automate this process further by triggering the script as a post-deployment task or make it run right after spinning off your Docker containers.
# Clear the deployment folder
Remove-Item –path C:\Dev\Sitecore91\docker\code\* -Recurse

# Build and deploy solution code into deployment folder
C:\"Program Files (x86)\Microsoft Visual Studio"\2019\BuildTools\MSBuild\Current\Bin\MsBuild.exe /t:Clean,Build /p:DeployOnBuild=true /p:PublishProfile=Docker

# Copy solution code within the container
docker exec ltsc2019_cm_1 robocopy \deployment\code \inetpub\sc /s
docker exec ltsc2019_cd_1 robocopy \deployment\code \inetpub\sc /s
- Local deployment folder is "C:\Dev\Sitecore91\docker". It contains 2 folders: "code" and "serialization" to deploy the code and serialization files separately.
- Publish profile for each project is "Docker".
- "Docker" publish profile target folder is your Local deployment folder.
- Using absolute path for MsBuild.exe in my VS2019 instance, but could store MsBuild.exe path as environmental variable.
- Using robocopy as Copy-Item does not support long paths (over 260 chars) often present with Unicorn serialization.
- Code is deployed to both CM and CD instances, obviously.
This script copies the Unicorn serialization files for items' syns either in a fresh Sitecore container or after pulling code from code repository. It can be extended with Unicorn Remote item sync, which would automatically sync the items in your Docker container.
# Clear the deployment folder
Remove-Item –path C:\Dev\Sitecore91\docker\serialization\* -Recurse

$sourceFolder = "C:\dev\Sitecore91\src"
$destinationFolder = "C:\dev\Sitecore91\docker\serialization"

# Copy serialization files preserving the folder structure into deployment folder
$folders = Get-ChildItem $sourceFolder -Recurse -Directory | Where-Object { $_.Name.Equals("serialization") } | Select-Object -expandproperty fullname
ForEach($i in $folders) { robocopy $i $($destinationFolder+$i.replace($sourceFolder,"")) /s }

# Deploy serialization files in the container
docker exec ltsc2019_cm_1 robocopy \deployment\serialization \inetpub\sc\serialization /s
The scripts above do the job, while you're encouraged to extend and tune them. You'd run them tens of times a day to develop Sitecore with Docker, so try to make your experience as seamless and convenient as possible.
6. Accessing the databases
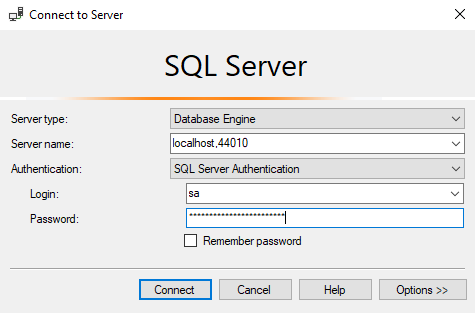
Sitecore databases are hosted in a separate container, by default ltsc2019_sql_1 available at localhost:44010. How to access the databases from outside of the container? Let's try with SSMS:

'localhost,44010' to access sqlserver available at localhost:44010 as mentioned above
login and password are available in Dockerfile for sitecore-xp-sqldev
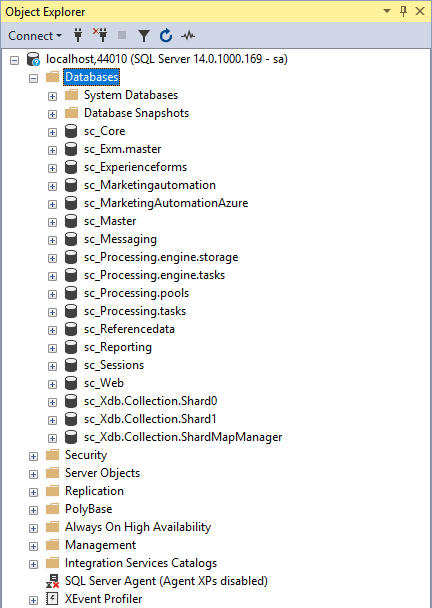
Now you're good to manipulate you Sitecore instance's databases just like in a regular, local dev environment:

Happy Sitecore development with Docker containers.