Sitecore.Link source code available on GitHub

As promised, we're feeding our work back to the Sitecore community and presenting you with the source code of Sitecore.Link - available here on GitHub.

Tech stack:

  • Sitecore JSS 14.0 (Sitecore 10 compatible)
  • React JS 16.8
  • GraphQL
  • Material-UI

We've provided a detailed installation guide, so you should get up and running quickly with your instance.
Also as mentioned in the previous post, there is a series of further blog posts coming up on how this app got designed and built, aiming at making it an approachable tutorial on how to help you to get into Sitecore JSS headless development.

Stay tuned.

New version of Sitecore.Link gone live!

After months of hard work we're releasing a new version of Sitecore.Link!

If you're not familiar with it yet - that's the most complete Sitecore knowledge database site available.
It runs on Sitecore JSS, utilizes the most up-to-date tech stack and is far more performant and user-friendly than the previous version.

We're going public with the source code soon on GitHub.
That will be followed with a tutorial-like series of blog posts here getting into the details of how it was designed and built, all of this to help you get your head around Sitecore JSS development too.

Stay tuned.

Sitecore development with Docker

There's already couple of good Sitecore Docker base images repositories on GitHub allowing you to quickly build and run Sitecore in Docker containers. Recently Martin Miles wrote a great tutorial on how to start with Sitecore in Docker containers. I'll explain how to make the next step and perform development of your Sitecore instance running in Docker.

1. Repository with Sitecore Docker base images
To start, we need Sitecore Docker images. sitecoreops/sitecore-images repository offers a diverse set of Sitecore (up-to-date - 9.1.1) base images providing you with scripts to build and run Sitecore in XP0, XM1 and XP1 topologies, including images with pre-installed Sitecore modules. Thanks to that, you can easily deploy a scaled instance of Sitecore with SXA or JSS!

 2. Docker registry (Optional)
It's not necessary, but makes your work with images easier as you can store a collection of built, ready to use images for immediate download. In case you don't want to use it, just modify the Powershell script provided in sitecore-images and cut out the code section referring to image upload. Alternatively, to turn off the image upload temporarily while keeping the registry configured and ready just in case, set the PushMode to "Never" (instead of "WhenChanged" by default).

My registry of choice is Azure Container Registry. Used it only as for image storage purpose, however, it offers many more features such as automatic image rebuild on code repository commit allowing you to always have an up-to-date collection of images corresponding to the latest code base. What comes in handy is that you can create as many repositories as you want. That's great in case of trying out XP1 topology consisting of 7 containers running in parallel (SOLR, SQL, CM, CD + another 3 for XConnect). Images are built with explicitly defined layers (separate Dockerfiles), so for instance the SXA CM is constructed with the following dependency chain, where each image means a separate repository:

sitecore-xp-sxa-1.8.1-standalone
sitecore-xp-pse-5.0-standalone
sitecore-xp-standalone
sitecore-xp-base

Basic tier gets you 10GBs of storage what costs less than 4£ a month (~$5; in North Europe Azure region). Complete set of images required to run SXA and JSS in XP takes less than 3GB, so the offered space seems to be definitely enough for a start. What's awesome, you don't have to update to a higher tier if running out of storage - you pay as you go and for example, another 10GBs used costs you around 0.8£ (~$1) a month, where all the extra costs are charged per day. Similar basic setup on Docker Hub would cost me $22 a month, so that was a no-brainer.

3. Volume configuration
Code: To deploy code to Docker container, you need to define a volume with a proper binding. It directly reflects the state of your local folder within a container. That means if you're hoping for binding your local Sitecore deployment folder to the container instance folder to blend your code in - that's a nope. Instead, the Sitecore instance files in container would get overwritten. The resolution is to use volumes to let your Docker container to access files from a host folder. That means you need to split your code deployment into 2 steps:

  • Deploy your code to a local deployment folder binded to a folder in Docker container
  • Copy that code to the Sitecore instance within your Docker container

To make the binding work as above, add this to your container's volumes section in docker-compose.yml:

volumes:
  - type: bind
    source: C:/Dev/Sitecore91/docker
    target: C:/deployment

"C:/Dev/Sitecore91/docker" is your local deployment folder where you deploy your solution and serialization files ('C:/Dev/Sitecore91' is my solution dev folder, so just added a 'docker' folder to it as a sibling of 'src' folder)
"C:/deployment" is a folder in your Docker container, where locally deployed files are accessible from

Serialization: To make the Unicorn serialization work, your CM instance needs to have serialization files accessible. To achieve that, you also need to use a binded folder as mentioned. Not to create additional bindings, let's use the one above making that folder a root container for both code and serialization files. Important thing to mention is that Unicorn locates the serialization files based on the folder structure as defined in your Unicorn config files. That means if you stick to outlined convention you need to copy the serialization files preserving the folder structure, just as they get serialized in your solution folder.

Tip Despite container recreation, your changes made to Sitecore databases will be preserved. Why's that? SQL instance in sitecore-images repo is pre-configured to use volumes too. If you take a closer look at sitecore-compose.yml, the SQL container definition has a volume defined:

volumes:
  - .\data\sql:C:\Data

which contains differential backups for all  the databases used in your Sitecore Docker deployment. Need clean, OOTB databases? Just delete those backups before the next run.

4. Solution configuration
Code: You need to create a publishing profile deploying files to your local deployment folder binded to the container. Make sure it's a separate, empty folder so that you can fully purge it before each deployment to assure it contains only the current unit of deployment (no leftovers). I just made it "C:\Dev\Sitecore91\docker\code".

Serialization: Unicorn depends on the sourceFolder variable defined in your config files. Make sure it contains a valid path within your Docker container, so in our case:

<sc.variable name="sourceFolder" value="C:\inetpub\sc\serialization" />

"C:\inetpub\sc" is a default sc instance folder defined in Dockerfiles for base images in sitecore-images repo.

5. Deployment scripts
Here's a basic script performing code deployment. You can run it each time to deploy the code, automate this process further by triggering the script as a post-deployment task or make it run right after spinning off your Docker containers.

# Clear the deployment folder
Remove-Item –path C:\Dev\Sitecore91\docker\code\* -Recurse

# Build and deploy solution code into deployment folder
C:\"Program Files (x86)\Microsoft Visual Studio"\2019\BuildTools\MSBuild\Current\Bin\MsBuild.exe /t:Clean,Build /p:DeployOnBuild=true /p:PublishProfile=Docker

# Copy solution code within the container
docker exec ltsc2019_cm_1 robocopy \deployment\code \inetpub\sc /s
docker exec ltsc2019_cd_1 robocopy \deployment\code \inetpub\sc /s
  • Local deployment folder is "C:\Dev\Sitecore91\docker". It contains 2 folders: "code" and "serialization" to deploy the code and serialization files separately.
  • Publish profile for each project is "Docker".
  • "Docker" publish profile target folder is your Local deployment folder.
  • Using absolute path for MsBuild.exe in my VS2019 instance, but could store MsBuild.exe path as environmental variable.
  • Using robocopy as Copy-Item does not support long paths (over 260 chars) often present with Unicorn serialization.
  • Code is deployed to both CM and CD instances, obviously.


This script copies the Unicorn serialization files for items' syns either in a fresh Sitecore container or after pulling code from code repository. It can be extended with Unicorn Remote item sync, which would automatically sync the items in your Docker container.

# Clear the deployment folder
Remove-Item –path C:\Dev\Sitecore91\docker\serialization\* -Recurse

$sourceFolder = "C:\dev\Sitecore91\src"
$destinationFolder = "C:\dev\Sitecore91\docker\serialization"

# Copy serialization files preserving the folder structure into deployment folder
$folders = Get-ChildItem $sourceFolder -Recurse -Directory | Where-Object { $_.Name.Equals("serialization") } | Select-Object -expandproperty fullname
ForEach($i in $folders) { robocopy $i $($destinationFolder+$i.replace($sourceFolder,"")) /s }

# Deploy serialization files in the container
docker exec ltsc2019_cm_1 robocopy \deployment\serialization \inetpub\sc\serialization /s

The scripts above do the job, while you're encouraged to extend and tune them. You'd run them tens of times a day to develop Sitecore with Docker, so try to make your experience as seamless and convenient as possible.

6. Accessing the databases
Sitecore databases are hosted in a separate container, by default ltsc2019_sql_1 available at localhost:44010. How to access the databases from outside of the container? Let's try with SSMS:


'localhost,44010' to access sqlserver available at localhost:44010 as mentioned above
login and password are available in Dockerfile for sitecore-xp-sqldev

Now you're good to manipulate you Sitecore instance's databases just like in a regular, local dev environment:


Happy Sitecore development with Docker containers.

Cognitive Services + Sitecore: Smart image tagging with AI (part 2)

Sitecore 9.1 release has brought many useful features including Cortex - widely advertised integration and support for AI and ML. For now it covers 2 features: component personalisation suggestions and content tagging. The latter comes with an OOTB integration with OpenCalais API. This service provided by Thomson Reuters provides categorisation suggestions based on the meaning of provided content. Combined with Sitecore, it automatically assigns tags based on item's text fields content.

Unfortunately, it's fairly simple and does not cover tagging based on the image content. However, with the help of Microsoft Cognitive Services (Tag Image endpoint to be precise) we can make it work and get a collection of relevant tags.

Let's get to work. To start we need to figure out OOTB tagging architecture and how it works, so a quick look at Sitecore docs gives us a brief idea of what we need. What we'll do is extending the current content tagging pipeline, so that processing a media item will not only use OpenCalais (which must be active) with item's text fields to produce the tags, but also use the MS Cognitive Services to analyze the image and describe it with appropriate tags.

Precisely, what we need are 2 new providers:

  • Content provider extracting the string of relevant information out of the item for further analysis
  • Discovery provider containing the business logic behind processing extracted data and producing tags

Ideally, there should be also an initial validation processor encapsulating all the checks and aborting the pipeline in case of any issues (missing configuration etc.) or if the item is not a good fit for our custom tagging. In our case it's just a functional extension, so performing such an abortion would stop the whole Content Tagging pipeline, not just our additional functionality resulting in no tags assigned at all. Because of that and to simplify the code, I decided to move those checks to Content and Discovery providers. What's more, not all 4 of providers available to be put in the pipeline have to be implemented. That means that Content and Discovery ones will add extra image tags returned by the API for a further, standard processing performed by the latter 2 providers. The configuration of such extension looks as follows:

<configuration xmlns:patch="http://www.sitecore.net/xmlconfig/" xmlns:role="http://www.sitecore.net/xmlconfig/role/">
  <sitecore>
    <contentTagging>
      <configurations>
        <config name="Default">
          <content>
            <provider name="ComputerVisionContentProvider"/>
          </content>
          <discovery>
            <provider name="ComputerVisionDiscoveryProvider"/>
          </discovery>
        </config>
      </configurations>
      <providers>
        <content>
          <add name="ComputerVisionContentProvider" type="Sitecore91.Foundation.Tagging.Providers.ComputerVisionContentProvider, Sitecore91.Foundation.Tagging" />
        </content>
        <discovery>
          <add name="ComputerVisionDiscoveryProvider" type="Sitecore91.Foundation.Tagging.Providers.ComputerVisionDiscoveryProvider, Sitecore91.Foundation.Tagging" />
        </discovery>
      </providers>
    </contentTagging>
  </sitecore>
</configuration>

Now, here's the Content provider extracting the taggable data from the item. Standard process is extraction of the item text fields and sending them down the pipeline for conversion into tags. In our case to tightly follow that purpose we'd have to serialize the image into byte array. Let's go for a different approach, extract just the image ID and pass it further so that we'll delegate and encapsulate this task within Discovery provider. The only check we make is if it's a media item which does not eliminate, but strongly reduce the number of unsupported items left for further processing.

using Sitecore.ContentTagging.Core.Models;
using Sitecore.ContentTagging.Core.Providers;
using Sitecore.Data.Items;

namespace Sitecore91.Foundation.Tagging.Providers
{
    public class ComputerVisionContentProvider : IContentProvider<Item>
    {
        public TaggableContent GetContent(Item item)
        {
            var stringContent = new StringContent();
            if (item.Paths.IsMediaItem)
            {
                stringContent.Content = item.ID.ToString();
            }
            return stringContent;
        }
    }
}

To align the business logic with the approach taken in Content provider, we need think on how to handle the 'special' case of processing the image item. Just to remind: the providers described here are just extending the existing pipeline, so we focus on handling this case only exclusively by processing the taggable content only if:

  • all it contains is an item ID (it's been processed by our custom Content provider)
  • the item is a media item (in this use case we're tagging images from media library only)
  • the media item is an image (as only images will get correctly tagged by the service)

After that we just serialize such image and pass it to the service. Please keep in mind that we also have the other 'Tag' implementation accepting image URL which would make the API calls much faster. I just used the other overload as found it easier to use in development environment.

I also made use of the 'confidence' parameter to filter out the tags with less than 50% of confidence to filter out the potentially irrelevant tags.

using System.Collections.Generic;
using System.Drawing;
using System.Linq;
using Microsoft.Extensions.DependencyInjection;
using Sitecore.ContentTagging.Core.Models;
using Sitecore.ContentTagging.Core.Providers;
using Sitecore.Data;
using Sitecore.Data.Items;
using Sitecore.DependencyInjection;
using Sitecore91.Foundation.CognitiveServices.ComputerVision;

namespace Sitecore91.Foundation.Tagging.Providers
{
    public class ComputerVisionDiscoveryProvider : IDiscoveryProvider
    {
        public IEnumerable<TagData> GetTags(IEnumerable<TaggableContent> content)
        {
            var computerVisionService = ServiceLocator.ServiceProvider.GetService<IComputerVisionService>();

            var tagDataList = new List<TagData>();
            foreach (StringContent stringContent in content)
            {
                if (string.IsNullOrEmpty(stringContent?.Content) || !ID.TryParse(stringContent.Content, out var itemId))
                    continue;

                var item = Sitecore.Configuration.Factory.GetDatabase("master").GetItem(itemId);
                if (!item.Paths.IsMediaItem)
                    continue;

                var mediaItem = new MediaItem(item);
                if (!mediaItem.MimeType.StartsWith("image/"))
                    continue;

                var image = (byte[]) new ImageConverter().ConvertTo(Image.FromStream(mediaItem.GetMediaStream()), typeof(byte[]));
                var result = computerVisionService.Analyze(image, "tags", "", "en");
                var tags = result.tags.Where(x => x.confidence > 0.5).Select(x => x.name);

                tagDataList.AddRange(tags.Select(tag => new TagData {TagName = tag}));
            }
            return tagDataList;
        }

        public bool IsConfigured()
        {
            return true;
        }
    }
}

From implementation point of view that's it - 2 providers extending the pipeline. All you have to do now to test the solution is to select a media item in Content Editor, select the Home tab in the ribbon and click Tag Item in Content Tagging section. After several seconds of processing of our sample image:

You can refresh the 'Tagging' section to see the following tags:

That aligns with the collection generated in my previous post where we directly hit the service with this exact image. We have 1 tag missing comparing with the previous tag set and that's the result of filtering using the 'confidence' field.

Cognitive Services: Smart image tagging with AI (part 1)

The challenge sounds simple: How to generate a collection of keywords describing an image?

By description I don't mean its metadata like width or MIME type, but rather the actual content of it. Of course, solutions like asking your mom to spend her afternoon doing that manually for you are not considered good practice - especially when talking about thousands of images and you hoping for any presents next Christmas.

Talking seriously, this task sounds ideal for usage of AI/ML which have become very hot topics these days and are trending to be applicable in a rapidly growing number of areas. I have already partially covered this topic providing a good example of Microsoft Cognitive Services utilisation in my previous post. I encourage you to read it if you'd like to broaden your knowledge around usage of it with Sitecore and SXA.

To get to the point and answer the question asked in the first caption: let's make use of Tag Image endpoint to get a collection of relevant tags. In order to have some flexibility with applying the tagging solution let's prepare 2 implementations: one accepting a serialized image while the other a URL to an image available online:

using Sitecore91.Foundation.CognitiveServices.Models;

namespace Sitecore91.Foundation.CognitiveServices.ComputerVision
{
    public interface IComputerVisionService
    {
        TagModel Tag(byte[] image, string language);
        TagModel Tag(string imageUrl, string language);
    }
}

The TagModel class is a C# representation of the API JSON result:

using System.Collections.Generic;

namespace Sitecore91.Foundation.CognitiveServices.Models
{
    public class TagModel
    {
        public List<Tag> tags { get; set; }
        public string requestId { get; set; }
    }

    public class Tag
    {
        public string name { get; set; }
        public double confidence { get; set; }
    }
}

TIP: This model is fairy simple, but for more complex JSON structures you can simply generate it yourself by processing a sample success JSON result from Image Tag docs with json2sharp. Just take a look at different endpoints like Analyze Image where the JSON result maps to a structure of almost 20 C# classes.

Now, here's the service:

using System;
using System.Net.Http;
using System.Net.Http.Headers;
using Sitecore.Diagnostics;
 
namespace Sitecore91.Foundation.CognitiveServices.ComputerVision
{
    public class ComputerVisionService : IComputerVisionService
    {
        private readonly string _subscriptionKey = "<-SUBSCRIPTION KEY->";
        private readonly string _serviceUrl = "https://<-AZURE REGION->.api.cognitive.microsoft.com/vision/v2.0/";
 
        public TagModel Tag(byte[] image, string language)
        {
            var apiMethod = "tag";
            var requestUri = _serviceUrl + apiMethod + $"?language={language}";

            try
            {
                using (var client = new HttpClient())
                {
                    client.DefaultRequestHeaders.Add("Ocp-Apim-Subscription-Key", _subscriptionKey);

                    using (var content = new ByteArrayContent(image))
                    {
                        content.Headers.ContentType = new MediaTypeHeaderValue("application/octet-stream");
                        using (var response = client.PostAsync(requestUri, content).GetAwaiter().GetResult())
                        {
                            if (response.IsSuccessStatusCode)
                            {
                                var result = response.Content.ReadAsStringAsync().GetAwaiter().GetResult();
                                return JsonConvert.DeserializeObject<TagModel>(result);
                            }
                            var errorMessage = response.Content.ReadAsStringAsync().GetAwaiter().GetResult();
                            Log.Error(errorMessage, this);
                            return null;
                        }
                    }
                }
            }
            catch (Exception e)
            {
                Log.Error(e.Message, this);
                return null;
            }
        }

        public TagModel Tag(string imageUrl, string language)
        {
            var apiMethod = "tag";
            var requestUri = _serviceUrl + apiMethod + $"?language={language}";

            try
            {
                using (var client = new HttpClient())
                {
                    client.DefaultRequestHeaders.Add("Ocp-Apim-Subscription-Key", _subscriptionKey);

                    using (var content = new StringContent($"{{url:\"{imageUrl}\"}}"))
                    {
                        content.Headers.ContentType = new MediaTypeHeaderValue("application/json");
                        using (var response = client.PostAsync(requestUri, content).GetAwaiter().GetResult())
                        {
                            if (response.IsSuccessStatusCode)
                            {
                                var result = response.Content.ReadAsStringAsync().GetAwaiter().GetResult();
                                return JsonConvert.DeserializeObject<TagModel>(result);
                            }
                            var errorMessage = response.Content.ReadAsStringAsync().GetAwaiter().GetResult();
                            Log.Error(errorMessage, this);
                            return null;
                        }
                    }
                }
            }
            catch (Exception e)
            {
                Log.Error(e.Message, this);
                return null;
            }
        }
    }
}

If you took a look at my previous post mentioned before, you'll find this piece of code looking almost identical. We'll, in fact all we do is just another API call with some JSON result mapping afterwards. To test if it works fine I prepared a sample controller action registered with custom MVC routing:

public ActionResult TestTagging()
{
    var computerVisionService = new ComputerVisionService();
    var imageUrl = "https://images.pexels.com/photos/849835/pexels-photo-849835.jpeg";
    var model = computerVisionService.Tag(imageUrl, "en");

    return new ContentResult { Content = string.Join("<br />", model.tags.Select(x => $"{x.name}:{x.confidence}")) };
}


Now, for the image below:

We get the following collection of tags returned by the service:

sky:0.996140539646149
truck:0.954374551773071
car:0.951652050018311
outdoor:0.936659157276154
snow:0.905518352985382
blue:0.871806204319
transport:0.659421741962433
winter:0.175758534148281

The float value from 0.0-1.0 range next to each tag is its 'confidence', representing how 'sure' the AI is about the relevance of each assigned tag. It's very useful for accurate tagging, as finding a correct threshold allows you to tune the tagging relevance for your own needs.

Cognitive Services + SXA: Custom Rendering Variant field

In my previous post we utilised MS Cognitive Services to assist with cropping images smart way on the fly. The reason for that was to reuse a single HQ image in different display size scenarios (pages / devices) focused on image's centre of interest rather than creating and maintaining a manually cropped collection.

Now, as we have the service implementation in place let's integrate it with SXA. Considering the purpose described above, a really good usage example is creating a new Rendering Variant field to process the referenced image according to provided size and cropping mode.


1. To start, create a Rendering Variant field template and tailor it for service's purpose by adding the minimal set of values needed to utilise the previously developed service:


2. Then, add this newly defined field to one of the Rendering Variants containing an image to crop:


Now some code backing up the functionality of created items:

3. In general, what we need to do is extending parseVariantFields and renderVariantField pipelines:

<?xml version="1.0" encoding="utf-8" ?>
<configuration xmlns:patch="http://www.sitecore.net/xmlconfig/">
  <sitecore>
    <pipelines>
      <parseVariantFields>
        <processor type="Sitecore91.Foundation.SXAExtensions.Pipelines.VariantFields.SmartThumbnail.ParseSmartThumbnail, Sitecore91.Foundation.SXAExtensions" resolve="true"/>
      </parseVariantFields>
      <renderVariantField>
        <processor type="Sitecore91.Foundation.SXAExtensions.Pipelines.VariantFields.SmartThumbnail.RenderSmartThumbnail, Sitecore91.Foundation.SXAExtensions" resolve="true"/>
      </renderVariantField>
    </pipelines>
  </sitecore>
</configuration>


4. Then implement a new Rendering Variant field to be processed by those pipelines:

using Sitecore.Data.Items;
using Sitecore.XA.Foundation.RenderingVariants.Fields;

namespace Sitecore91.Foundation.SXAExtensions.Pipelines.VariantFields.SmartThumbnail
{
    public class SmartThumbnailVariant : RenderingVariantFieldBase
    {
        public int Width { get; set; }
        public int Height { get; set; }
        public bool IsSmartCrop { get; set; }

        public SmartThumbnailVariant(Item variantItem) : base(variantItem) { }
    }
}


5. Followed by the processor responsible for parsing the Rendering Variant field:

using Sitecore.Data;
using Sitecore.XA.Foundation.Variants.Abstractions.Pipelines.ParseVariantFields;

namespace Sitecore91.Foundation.SXAExtensions.Pipelines.VariantFields.SmartThumbnail
{
    public class ParseSmartThumbnail : ParseVariantFieldProcessor
    {
        public override ID SupportedTemplateId => Constants.RenderingVariants.SmartThumbnail.Fields.SmartThumbnailVariant;

        public override void TranslateField(ParseVariantFieldArgs args)
        {
            var variantFieldsArgs = args;

            var smartThumbnail = new SmartThumbnailVariant(args.VariantItem)
            {
                ItemName = args.VariantItem.Name,
                FieldName = args.VariantItem.Fields[Constants.RenderingVariants.SmartThumbnail.Fields.FieldName].GetValue(true),
                Width = int.TryParse(args.VariantItem.Fields[Constants.RenderingVariants.SmartThumbnail.Fields.Width].GetValue(true), out var width) ? width : 0,
                Height = int.TryParse(args.VariantItem.Fields[Constants.RenderingVariants.SmartThumbnail.Fields.Height].GetValue(true), out var height) ? height : 0,
                IsSmartCrop = int.TryParse(args.VariantItem.Fields[Constants.RenderingVariants.SmartThumbnail.Fields.IsSmartCrop].GetValue(true), out var smartCropValue) && smartCropValue == 1
            };
            variantFieldsArgs.TranslatedField = smartThumbnail;
        }
    }
}

Where Constants is a standard helper class with static IDs:

using Sitecore.Data;

namespace Sitecore91.Foundation.SXAExtensions
{
    public struct Constants
    {
        public struct RenderingVariants
        {
            public struct SmartThumbnail
            {
                public struct Fields
                {
                    public static ID SmartThumbnailVariant => new ID("{00458333-70A1-4D52-B375-62CBE13575CD}");
                    public static ID FieldName => new ID("{0B00BC72-0C1C-4A49-8C94-297E38E511E7}");
                    public static ID Width => new ID("{51A093C8-A516-4A70-8223-7B907DCB0958}");
                    public static ID Height => new ID("{6447EF7A-D84E-4CA9-9F57-7A7AC6FE87D6}");
                    public static ID IsSmartCrop => new ID("{4C4899C4-CA85-451A-9FEE-ECCD678D01FD}");
                }
            }
        }
    }
}


6. Finally, Rendering Variant field where the actual service call and rendering HTML preparation take place:

using System;
using System.Drawing;
using System.IO;
using System.Web.UI.HtmlControls;
using Sitecore.Data.Fields;
using Sitecore.Data.Items;
using Sitecore.Resources.Media;
using Sitecore.SecurityModel;
using Sitecore.XA.Foundation.RenderingVariants.Pipelines.RenderVariantField;
using Sitecore.XA.Foundation.Variants.Abstractions.Models;
using Sitecore.XA.Foundation.Variants.Abstractions.Pipelines.RenderVariantField;
using Sitecore91.Foundation.CognitiveServices.ComputerVision;

namespace Sitecore91.Foundation.SXAExtensions.Pipelines.VariantFields.SmartThumbnail
{
    public class RenderSmartThumbnail : RenderRenderingVariantFieldProcessor
    {
        private readonly IComputerVisionService _computerVisionService;
        public override Type SupportedType => typeof(SmartThumbnailVariant);
        public override RendererMode RendererMode => RendererMode.Html;

        public RenderSmartThumbnail()
        {
            _computerVisionService = ServiceLocator.ServiceProvider.GetService<IComputerVisionService>();
        }

        public override void RenderField(RenderVariantFieldArgs args)
        {
            var variantField = args.VariantField as SmartThumbnailVariant;
            var imageUrl = default(string);

            if (args.Item != null && !string.IsNullOrWhiteSpace(variantField?.FieldName))
            {
                ImageField imageField = args.Item.Fields[variantField.FieldName];
                if (imageField?.MediaItem != null)
                {
                    var thumbNameSuffix = "_thumb";
                    var newItemPath = imageField.MediaItem.Paths.Path + thumbNameSuffix;
                    var mediaItem = (MediaItem) imageField.MediaItem;

                    var thumbMediaItem = mediaItem.Database.GetItem(newItemPath);
                    if (thumbMediaItem != null)
                    {
                        using (new SecurityDisabler())
                        {
                            thumbMediaItem.Delete();
                        }
                    }

                    var image = (byte[])new ImageConverter().ConvertTo(Image.FromStream(mediaItem.GetMediaStream()), typeof(byte[]));
                    var thumbnail = _computerVisionService.GetThumbnail(image, variantField.Width, variantField.Height, variantField.IsSmartCrop);

                    if (thumbnail == null)
                    {
                        return;
                    }

                    using (var memoryStream = new MemoryStream(thumbnail))
                    {
                        var mediaCreator = new MediaCreator();
                        var options = new MediaCreatorOptions
                        {
                            Versioned = false,
                            IncludeExtensionInItemName = false,
                            Database = mediaItem.Database,
                            Destination = newItemPath,
                            FileBased = false
                        };

                        using (new SecurityDisabler())
                        {
                            var newFileName = mediaItem.Name + thumbNameSuffix + "." + mediaItem.Extension;
                            thumbMediaItem = mediaCreator.CreateFromStream(memoryStream, newFileName, options);
                        }
                    }
                    imageUrl = MediaManager.GetMediaUrl(thumbMediaItem);
                }
            }

            if (string.IsNullOrWhiteSpace(imageUrl))
            {
                return;
            }

            var control = new HtmlGenericControl("img");
            control.Attributes.Add("src", imageUrl);

            args.ResultControl = control;
            args.Result = RenderControl(args.ResultControl);
        }
    }
}


If all gone well, we should see a smartly (considering the image centre of interest) cropped to desired size image as a part of our Rendering Variant:


The given example is just an outline use case that generates some simple HTML code to display the image. Naturally, it can be extended further to offer more flexibility, e.g. like the 'Responsive Image' field does.

Cognitive Services: Smart image cropping with AI

At the recent London Sitecore User Group meetup Ian Jepp from Lake Solutions gave a talk on AI Images. He outlined a common problem faced these days where it's a compromise between managing a set of tailored versions of the same image differently scaled for multiple devices and page occurrences, and usage of a single HQ image scaled to desired size. While the first comes with a huge resourcing cost to create and manage such collections, the latter severely impacts the page load time harming both UX and SEO results with Google.

The presented solution was to get images cropped on the fly to thumbnails. That's not a big deal when cutting down to a fixed area of an image, e.g. centre of it, however, would that be sufficient from the UX perspective?

Let's have a look at example with this original image:


It's already been scaled down for presentation purpose while a HQ version of it would be several MBs, but still serves the purpose well. Now, let's say we'd like to like to generate a 200x200px thumbnail selecting the central area of the image:


Unfortunately, that doesn't look satisfactory as we've cut out a bit of our 'area of interest' which is the car itself. We could have manually selected the 200x200px frame around the car, however, performing this action in bulk, e.g. adjusting thousands of images in the Media Library to produce thumbnails - that sounds like a lot of tedious, manual work and not an acceptable option without a team of editors.

Here come the Microsoft Cognitive Services with Computer Vision Service offering its advanced features for processing images, including 'smart' image cropping what is exactly what we need. Let's see how the service would handle this task for us using AI to identify the crucial area and cutting the image down to desired size:


That's a spot on result.

As the presentation didn't come with open-source code to try it out, I've decided to spend some time on exploring this topic further.

To get Cognitive Services assistance with this task, we need some code sending an image to Computer Vision Service together with the desired width and height of the result image. Microsoft offers a code sample for a quick start. As the service allows some flexibility on how to provide it with the image source (API Reference), I'll present 2 overloads - one accepting a serialized image, while the other providing URL of one already available on the web (that includes your CDN of course):

namespace Sitecore91.Foundation.CognitiveServices.ComputerVision
{
    public interface IComputerVisionService
    {
        byte[] GetThumbnail(byte[] image, int width, int height, bool isSmartCrop = true);
        byte[] GetThumbnail(string imageUrl, int width, int height, bool isSmartCrop = true);
    }
}

Now, let's get a simple implementation:

using System;
using System.Net.Http;
using System.Net.Http.Headers;
using Sitecore.Diagnostics;

namespace Sitecore91.Foundation.CognitiveServices.ComputerVision
{
    public class ComputerVisionService : IComputerVisionService
    {
        private readonly string _subscriptionKey = "<-SUBSCRIPTION KEY->";
        private readonly string _serviceUrl = "https://<-AZURE REGION->.api.cognitive.microsoft.com/vision/v2.0/";

        public byte[] GetThumbnail(byte[] image, int width, int height, bool isSmartCrop = true)
        {
            var apiMethod = "generateThumbnail";
            var requestUri = _serviceUrl + apiMethod + $"?width={width}&height={height}&smartCropping={isSmartCrop}";

            try
            {
                using (var client = new HttpClient())
                {
                    client.DefaultRequestHeaders.Add("Ocp-Apim-Subscription-Key", _subscriptionKey);
                    
                    using (var content = new ByteArrayContent(image))
                    {
                        content.Headers.ContentType = new MediaTypeHeaderValue("application/octet-stream");
                        using (var response =  client.PostAsync(requestUri, content).GetAwaiter().GetResult())
                        {
                            if (response.IsSuccessStatusCode)
                            {
                                return response.Content.ReadAsByteArrayAsync().GetAwaiter().GetResult();
                            }
                            var errorMessage = response.Content.ReadAsStringAsync().GetAwaiter().GetResult();
                            Log.Error(errorMessage, this);
                            return null;
                        }
                    }
                }
            }
            catch (Exception e)
            {
                Log.Error(e.Message, this);
                return null;
            }
        }

        public byte[] GetThumbnail(string imageUrl, int width, int height, bool isSmartCrop = true)
        {
            var apiMethod = "generateThumbnail";
            var requestUri = _serviceUrl + apiMethod + $"?width={width}&height={height}&smartCropping={isSmartCrop}";

            try
            {
                using (var client = new HttpClient())
                {
                    client.DefaultRequestHeaders.Add("Ocp-Apim-Subscription-Key", _subscriptionKey);

                    using (var content = new StringContent($"{{url:\"{imageUrl}\"}}"))
                    {
                        content.Headers.ContentType = new MediaTypeHeaderValue("application/json");
                        using (var response = client.PostAsync(requestUri, content).GetAwaiter().GetResult())
                        {
                            if (response.IsSuccessStatusCode)
                            {
                                return response.Content.ReadAsByteArrayAsync().GetAwaiter().GetResult();
                            }
                            var errorMessage = response.Content.ReadAsStringAsync().GetAwaiter().GetResult();
                            Log.Error(errorMessage, this);
                            return null;
                        }
                    }
                }
            }
            catch (Exception e)
            {
                Log.Error(e.Message, this);
                return null;
            }
        }
    }
}

Code looks quite straightforward. All you need to do is replacing the 'SUBSCRIPTION KEY' and 'AZURE REGION' variables which you get upon registering for Azure Cognitive Services in a certain region. All the necessary information how to do that is available in the links provided above. What's more, Computer Vision Service offers a free tier sufficient for development and testing purposes, so nothing stops you from giving it a try with your solution.

SXA: Create custom NVelocity template renderer

One of the field types for display with Rendering Variants is Template. It allows you to define your own NVelocity template to embed custom processing of the output. The really cool thing about it that it can be made flexible even further and extended by adding custom renderers.

The templates mentioned above are processed by getVelocityTemplateRenderers SXA pipeline outlined here. That gives us a trace that this could be achieved with extending the pipeline by adding a custom AddTemplateRenderers processor. Taking a closer look with ILSpy at Sitecore.XA.Foundation.Variants.Abstractions.dll reveals that we can do that by implementing the IGetTemplateRenderersPipelineProcessor.

SXA docs for Creating a Rendering Variant available here describe a predefined set of objects and tools provided with SXA to use in the template:

  • $item: access to the current item ($item.Name displays current item name).
  • $dateTool.Format(date, format): formats date and time values.
  • $numberTool.Format(number, format): formats numbers.
  • $geospatial: in case of geospatial search ($geospatial.Distance) will show distance to certain point of interest).


What's really cool, you can easily extend this list and implement a custom renderer with business logic of your choice. Some good usage examples could be your company's real-time share price or current weather in your location. However, as Sitecore community is well known for it's outstanding sense of humour we need to keep up - let's create a tool rendering a random joke for display.

First, to locate where to hook our implementation, let's have a look into the getVelocityTemplateRenderers pipeline:

<getVelocityTemplateRenderers patch:source="Sitecore.XA.Foundation.Variants.Abstractions.config">
  <processor type="Sitecore.XA.Foundation.Variants.Abstractions.Pipelines.GetVelocityTemplateRenderers.InitializeVelocityContext, Sitecore.XA.Foundation.Variants.Abstractions" resolve="true"/>
  <processor type="Sitecore.XA.Foundation.Variants.Abstractions.Pipelines.GetVelocityTemplateRenderers.AddTemplateRenderers, Sitecore.XA.Foundation.Variants.Abstractions" resolve="true"/>
</getVelocityTemplateRenderers>


Based on the decompiled implementation of AddTemplateRenderers processor, we just need to inject another entry into the pipeline context. This should do the trick:

using Sitecore.XA.Foundation.Variants.Abstractions.Pipelines.GetVelocityTemplateRenderers;

namespace Sitecore91.Foundation.SXAExtensions.Pipelines.NVelocityTemplateRenderers
{
    public class AddCustomTemplateRenderers : IGetTemplateRenderersPipelineProcessor
    {
        public void Process(GetTemplateRenderersPipelineArgs args)
        {
            args.Context.Put("jokeTool", new JokeTool());
        }
    }
}


Our implementation of JokeTool consumes the Geek Jokes API to provide us with a random joke on each pipeline execution (at least as long as it's not cached):

using System;
using System.Net.Http;

namespace Sitecore91.Foundation.SXAExtensions.Pipelines.NVelocityTemplateRenderers
{
    public class JokeTool
    {
        public string GetRandomJoke()
        {
            var jokeApiUrl = "https://geek-jokes.sameerkumar.website/api";
            try
            {
                using (var httpClient = new HttpClient())
                {
                    return httpClient.GetStringAsync(jokeApiUrl).GetAwaiter().GetResult();
                }
            }
            catch (Exception e)
            {
                return "No jokes today.";
            }
        }
    }
}


Having code in place, let's wire it up with an appropriate patch in the end of pipeline:

<?xml version="1.0" encoding="utf-8" ?>
<configuration xmlns:patch="http://www.sitecore.net/xmlconfig/">
  <sitecore>
    <pipelines>
      <getVelocityTemplateRenderers>
        <processor type="Sitecore91.Foundation.SXAExtensions.Pipelines.NVelocityTemplateRenderers.AddCustomTemplateRenderers, Sitecore91.Foundation.SXAExtensions" 
                   patch:after="processor[@type='Sitecore.XA.Foundation.Variants.Abstractions.Pipelines.GetVelocityTemplateRenderers.AddTemplateRenderers, Sitecore.XA.Foundation.Variants.Abstractions']" />
      </getVelocityTemplateRenderers>
    </pipelines>
  </sitecore>
</configuration>


What should result in amending the pipeline as below:

<getVelocityTemplateRenderers patch:source="Sitecore.XA.Foundation.Variants.Abstractions.config">
  <processor type="Sitecore.XA.Foundation.Variants.Abstractions.Pipelines.GetVelocityTemplateRenderers.InitializeVelocityContext, Sitecore.XA.Foundation.Variants.Abstractions" resolve="true"/>
  <processor type="Sitecore.XA.Foundation.Variants.Abstractions.Pipelines.GetVelocityTemplateRenderers.AddTemplateRenderers, Sitecore.XA.Foundation.Variants.Abstractions" resolve="true"/>
  <processor type="Sitecore91.Foundation.SXAExtensions.Pipelines.NVelocityTemplateRenderers.AddCustomTemplateRenderers, Sitecore91.Foundation.SXAExtensions" patch:source="AddCustomTemplateRenderers.config"/>
</getVelocityTemplateRenderers>


To see in action our newly created tool, we use it with the Template field just like the other already predefined ones (e.g. $dateTool):


Now you can enjoy your day with a fresh portion of wisdom on each page visit:

That was literally fun.


SXA: Create custom query token

Rendering Variants offer convenient way of customising how SXA components get rendered. One of the most frequently used fields for building rendering variants is Query, which allows you to utilise item(s) out of the component's scope.

What SXA offers out of the box is a decent collection of predefined, routinely used tokens which help to simplify the queries and makes their usage much more convenient. They are listed here in the SXA docs for resolveTokens pipeline:

• $compatibleThemes - path to all themes
• $theme - currently used theme
• $pageDesigns - root of page designs
• $partialDesigns - root of partial designs
• $currenttemplate - name of the current template
• $tenant - path to the current tenant
• $site - path to the current site
• $home - path to the current site start item (Home)
• $templates - path to the current site templates
• $siteMedia - path to Virtual Media folder located under site

As you can see, it contains the most handy tokens we might need for building queries, such as home item ($home) or component template ($currentTemplate). Of course every application, depending on its business specific needs, 'develops' along the time it's own crucial nodes which become frequently referenced and used in the queries. Very good example is the root item for articles, which occurs in every web site offering news to the user.

In the following use case we will create $articles token referring to articles, which will be translated by resolveTokens pipeline as a query returning all items implementing template Article under the Articles root node.


Technically, what we need to do is extending the resolveTokens pipeline:

<resolveTokens patch:source="Sitecore.XA.Foundation.Multisite.config">
  <processor type="Sitecore.XA.Foundation.Multisite.Pipelines.ResolveTokens.ResolveMultisiteTokens, Sitecore.XA.Foundation.Multisite" resolve="true"/>
  <processor type="Sitecore.XA.Foundation.Presentation.Pipelines.ResolveTokens.ResolvePresentationTokens, Sitecore.XA.Foundation.Presentation" resolve="true" patch:source="Sitecore.XA.Foundation.Presentation.config"/>
  <processor type="Sitecore.XA.Foundation.Theming.Pipelines.ResolveTokens.ResolveThemingTokens, Sitecore.XA.Foundation.Theming" resolve="true" patch:source="Sitecore.XA.Foundation.Theming.config"/>
  <processor type="Sitecore.XA.Foundation.TokenResolution.Pipelines.ResolveTokens.CurrentTemplateToken, Sitecore.XA.Foundation.TokenResolution" resolve="true" patch:source="Sitecore.XA.Foundation.TokenResolution.config"/>
  <processor type="Sitecore.XA.Foundation.TokenResolution.Pipelines.ResolveTokens.EscapeQueryTokens, Sitecore.XA.Foundation.TokenResolution" resolve="true" patch:source="Sitecore.XA.Foundation.TokenResolution.config"/>
</resolveTokens>

by adding a new processor handling the custom token.


To figure out what exactly has to be implemented and how are the currently existing processors handling the predefined tokens, we can use ILSpy, dotPeek or any other .NET decompiler to take a closer look at Sitecore.XA.Foundation.TokenResolution.dll. It turns out that to extend the resolveTokens pipeline to handle custom token resolution, we need to implement the Pipelines.ResolveTokens.ResolveTokensProcessor abstract class.

To fulfill the use case mentioned before, I implemented it this way:

using Sitecore.Data.Items;
using Sitecore.XA.Foundation.TokenResolution.Pipelines.ResolveTokens;

namespace Sitecore91.Foundation.SXAExtensions.Pipelines.Tokens
{
    public class ResolveCustomTokens : ResolveTokensProcessor
    {
        public override void Process(ResolveTokensArgs args)
        {
            args.Query = ReplaceTokenWithValue(args.Query, "$articles", () => GetArticles(args.ContextItem));
        }

        private string GetArticles(Item contextItem)
        {
            var articlesRootPath = contextItem.Database.GetItem(Constants.Items.ArticlesHome).Paths.FullPath;
            var templateId = Constants.Templates.Article.ToString();

            return articlesRootPath + "//*[@@templateid='" + templateId + "']";
        }
    }
}


Just to clarify, Constants static class used in the processor is just a standard helper containing IDs of frequently used items:

using Sitecore.Data;

namespace Sitecore91.Foundation.SXAExtensions
{
    public struct Constants
    {
        public struct Items
        {
            public static ID ArticlesHome { get { return new ID("{4109F746-326F-4EF9-9BEB-D14261E8BD83}"); } }
        }

        public struct Templates
        {
            public static ID Article { get { return new ID("{3A98D12C-1911-49A6-8F8E-AAEDBCC9C3FD}"); } }
        }
    }
}


As the implementation code is in place we're almost there, what’s left is just wiring it up in the pipeline. We locate the processor right before the last one in the resolveTokens pipeline:

<?xml version="1.0" encoding="utf-8" ?>
<configuration xmlns:patch="http://www.sitecore.net/xmlconfig/">
  <sitecore>
    <pipelines>
      <resolveTokens>
        <processor type="Sitecore91.Foundation.SXAExtensions.Pipelines.Tokens.ResolveCustomTokens, Sitecore91.Foundation.SXAExtensions" 
                   patch:before="processor[@type='Sitecore.XA.Foundation.TokenResolution.Pipelines.ResolveTokens.EscapeQueryTokens, Sitecore.XA.Foundation.TokenResolution']" />
      </resolveTokens>
    </pipelines>
  </sitecore>
</configuration>


To double check the result, pipeline after the amendments should look like this:

<resolveTokens patch:source="Sitecore.XA.Foundation.Multisite.config">
  <processor type="Sitecore.XA.Foundation.Multisite.Pipelines.ResolveTokens.ResolveMultisiteTokens, Sitecore.XA.Foundation.Multisite" resolve="true"/>
  <processor type="Sitecore.XA.Foundation.Presentation.Pipelines.ResolveTokens.ResolvePresentationTokens, Sitecore.XA.Foundation.Presentation" resolve="true" patch:source="Sitecore.XA.Foundation.Presentation.config"/>
  <processor type="Sitecore.XA.Foundation.Theming.Pipelines.ResolveTokens.ResolveThemingTokens, Sitecore.XA.Foundation.Theming" resolve="true" patch:source="Sitecore.XA.Foundation.Theming.config"/>
  <processor type="Sitecore.XA.Foundation.TokenResolution.Pipelines.ResolveTokens.CurrentTemplateToken, Sitecore.XA.Foundation.TokenResolution" resolve="true" patch:source="Sitecore.XA.Foundation.TokenResolution.config"/>
  <processor type="Sitecore91.Foundation.SXAExtensions.Pipelines.Tokens.ResolveCustomTokens, Sitecore91.Foundation.SXAExtensions" patch:source="ResolveCustomTokens.config"/>
  <processor type="Sitecore.XA.Foundation.TokenResolution.Pipelines.ResolveTokens.EscapeQueryTokens, Sitecore.XA.Foundation.TokenResolution" resolve="true" patch:source="Sitecore.XA.Foundation.TokenResolution.config"/>
</resolveTokens>


OK, backend to support the $articles token is done, so let's start making use of it.

In Content Editor I created the Landing Page rendering variant to display few page values: Title, Published date and a Query referring to the collection of articles:


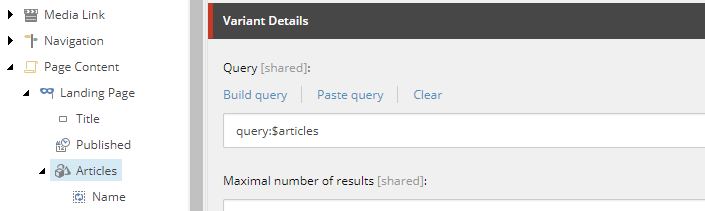
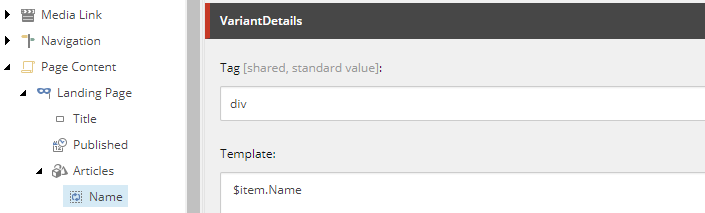
Of course, as articles are usually quite complex items, let's tailor their display to absolute minimum showing only their names for this example purpose. To achieve that, I added a child field of type Template to the Articles query and called it Name.

Template field thanks to the support of NVelocity templates refers to its context (article) item by usage of $item token. This means that for each returned article we select and display only it's name:

That's it.


Now, after making sure I applied the Landing Page rendering variant to the desired component, I am presented with the fields corresponding to the content of the item: Title, Published date, together with all (4, it's a test) of the articles names:

Hope this helps.